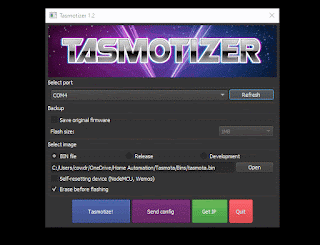
- Download Tasmotizer and get your SSID with password at hand
- Get an FTDI USB to Serial converter and install the drivers from here. Make sure that your converter is in 3.3V mode!
- If your drivers have been succesfully installed, disconnect the converter from your laptop.
- Get some jumper wires and check for the correct wiring. You need to connect the following pins:
- GND
- 3.3V (VCC)
- Rx
- Tx
- Connect the wires and use some masking tape to ensure they stick well to the board. Secure them with your finger and press the button, then connect the USB port into your computer. If the LED does not light, you have booted into flash mode.
- Select the correct port, release and then click on Tasmotize! Let the process run while you keep the pins connected to the board.
- When finished, click the Send config button and select the Wifi checkbox to enter your SSID with password. Push it through to your Sonoff
- Check for the IP address and open a browser. Check if you can reach the webpage of the Sonoff. If successful, you are done!
Friday, July 16, 2021
Flashing a Sonoff Basic R2 switch with Tasmota firmware
Subscribe to:
Post Comments (Atom)


No comments:
Post a Comment