Showing posts with label howto. Show all posts

Monday, June 8, 2026

Update wildcard certificate on Unifi Controller as Docker container & for Plex

root@server:/volume1/docker/unifi/data# cd /usr/syno/etc/certificate/_archive

root@server:/usr/syno/etc/certificate/_archive# ls -lrt

total 20

drwx------ 2 root root 4096 Mar 18 16:12 dCjJGL

-rwx------ 1 root root 1904 May 11 09:38 SERVICES

drwx------ 2 root root 4096 May 18 10:20 uE4Pkn

-rw------- 1 root root    7 May 18 10:21 DEFAULT

-rw------- 1 root root 2552 May 18 10:28 INFO

root@server:/usr/syno/etc/certificate/_archive# cd dCjJGL/

root@server:/usr/syno/etc/certificate/_archive/dCjJGL# ls -l

total 52

-r-------- 1 root root 1890 Mar 18 16:12 cert.pem

-r-------- 1 root root 1801 Mar 18 16:12 chain.pem

-r-------- 1 root root 1390 Mar 18 16:12 ECC-cert.pem

-r-------- 1 root root 1566 Mar 18 16:12 ECC-chain.pem

-r-------- 1 root root 2958 Mar 18 16:12 ECC-fullchain.pem

-r-------- 1 root root  241 Mar 18 16:12 ECC-privkey.pem

-r-------- 1 root root 3693 Mar 18 16:12 fullchain.pem

-r-------- 1 root root 1704 Mar 18 16:12 privkey.pem

-r-------- 1 root root  262 Mar 18 16:12 renew.json

-r-------- 1 root root 1890 Mar 18 16:12 RSA-cert.pem

-r-------- 1 root root 1801 Mar 18 16:12 RSA-chain.pem

-r-------- 1 root root 3693 Mar 18 16:12 RSA-fullchain.pem

-r-------- 1 root root 1704 Mar 18 16:12 RSA-privkey.pem

root@server:/usr/syno/etc/certificate/_archive/uE4Pkn# openssl x509 -in cert.pem -noout -ext subjectAltName -subject | grep -E "Subject:|DNS:"

    DNS:*.domain.com, DNS:domain.com

root@server:/usr/syno/etc/certificate/_archive/dCjJGL# openssl pkcs12 -export \

>   -in cert.pem \

>   -inkey privkey.pem \

>   -certfile chain.pem \

>   -out unifi.p12 \

>   -name unifi \

> ls -lrt^C

root@server:/usr/syno/etc/certificate/_archive/dCjJGL# ls -l

total 60

-r-------- 1 root root 1890 Mar 18 16:12 cert.pem

-r-------- 1 root root 1801 Mar 18 16:12 chain.pem

-r-------- 1 root root 1390 Mar 18 16:12 ECC-cert.pem

-r-------- 1 root root 1566 Mar 18 16:12 ECC-chain.pem

-r-------- 1 root root 2958 Mar 18 16:12 ECC-fullchain.pem

-r-------- 1 root root  241 Mar 18 16:12 ECC-privkey.pem

-r-------- 1 root root 3693 Mar 18 16:12 fullchain.pem

-r-------- 1 root root 1704 Mar 18 16:12 privkey.pem

-r-------- 1 root root  262 Mar 18 16:12 renew.json

-r-------- 1 root root 1890 Mar 18 16:12 RSA-cert.pem

-r-------- 1 root root 1801 Mar 18 16:12 RSA-chain.pem

-r-------- 1 root root 3693 Mar 18 16:12 RSA-fullchain.pem

-r-------- 1 root root 1704 Mar 18 16:12 RSA-privkey.pem

-rw------- 1 root root 4344 May 18 22:01 unifi.p12

root@server:/usr/syno/etc/certificate/_archive/dCjJGL# mv unifi.p12 /volume1/docker/unifi/data/ && cd /volume1/docker/unifi/data/

root@server:/volume1/docker/unifi/data# ls -l

total 228

drwxr-xr-x+ 3 admin users   4096 Mar  6 15:53 backup

drwxr-xr-x+ 4 admin users  40960 May 18 22:01 db

-rwxr-xr-x+ 1 root  root   35879 May 18 09:41 firmware.json

-rwxr-xr-x+ 1 admin users   6502 May 11 09:39 keystore

-rwxr-xr-x+ 1 admin users   2742 Aug 28  2023 keystore-2023-08-28.bak

-rwxr-xr-x+ 1 root  root    6502 May 18 21:57 keystore-2026-05-18.bak

-rwxr-xr-x+ 1 admin users   1424 May 18 21:40 model_lifecycles.json

-rwxr-xr-x+ 1 admin users      0 Oct 17  2023 system_env

-rwxr-xr-x+ 1 root  root    1394 May 11 09:40 system.properties

-rwxr-xr-x+ 1 root  root    1394 May 11 09:40 system.properties.bk

-rwxr-xr-x+ 1 root  root  110245 May 15 17:41 uidb.json

-rw-------  1 root  root    4344 May 18 22:01 unifi.p12

root@server:/volume1/docker/unifi/data# docker exec -it unifi keytool -importkeystore \

>   -srckeystore /unifi/data/unifi.p12 \

>   -srcstoretype PKCS12 \

>   -srcstorepass aircontrolenterprise \

>   -destkeystore /unifi/data/keystore \

>   -deststoretype JKS \

>   -deststorepass aircontrolenterprise \

>   -alias unifi

Importing keystore /unifi/data/unifi.p12 to /unifi/data/keystore...

Existing entry alias unifi exists, overwrite? [no]:  yes

root@server:/volume1/docker/unifi/data#

Plex (password = plex)

root@server:/usr/syno/etc/certificate/_archive/uE4Pkn# openssl pkcs12 -export -out /volume1/PlexMediaServer/plex_wildcard.pfx \

> -inkey privkey.pem \

> -in cert.pem \

> -certfile chain.pem \

> -certpbe AES-256-CBC \

> -keypbe AES-256-CBC \

> -macalg SHA256

Enter Export Password:

Verifying - Enter Export Password:


Monday, September 25, 2023

Advanced installation of a Raspberry Pi with Raspbian Bullseye

When installing a Raspberry Pi, I have a checklist of steps I take each time to ensure my Raspberry Pi's are (mostly) configured in the same way. They have the same way to backup their data, use the same user configurations (ntp, syslog, sendmail...) and have the same security provisioning. We will also introduce logs into memory with Log2Ram, to avoid too much SD card writing/wearing, which will eventually break your RPi. Feel free to comment on any step that is documented here. Some steps might be optional or unnecessary in your case.

  1. Do the physical installation, plugin the network and HDMI cables (except the power cable of course) and screw your RPi into a cover or box.
  2. Prepare SD card on Mac with Raspberry Pi Imager
  3. Plugin the SD card into your RPi and now also plugin the power cable. Boot your RPi for the first time now. Create a user with password for using later. (e.g. user:pi, password:raspberry)
  4. When booted, you'll be provided with a prompt to login for the first time. Mind the QWERTY keyboard layout.
  5. Run the setup tool
    sudo raspi-config
  6. Configure the setup tool
    1. Set the hostname (1 System Options > S4 Hostname)
    2. Expand Filesystem (6 Advanced Options > A1 Expand file system)
    3. Change Timezone, set Keyboard Layout (if needed) and change Wifi Country (5 Localization Options > L2 Change Timezone, L3 Change Keyboard Layout, L4 Change Wi-fi Country)
    4. Enable SSH (3 Interfacing Options > I2 SSH)
    5. Press 'Finish' and Reboot
  7. After reboot, login again via SSH and change your user password:
    passwd
  8. Generate a SSH key-gen pair, which is more robust than the default one.
    ssh-keygen -o -a 100 -t ed25519
  9. Change the root password
    sudo passwd root
  10. Set the ETH0 IP address to a fixed IP. I hardly ever use the Wifi module in a Raspberry Pi
    sudo vi /etc/network/interfaces
    Add at the end of the file the following:
    # Added by user on 2023-XX-XX
    auto eth0
    iface eth0 inet static
            address 192.168.0.240/24
            network 192.168.0.0
            broadcast 192.168.0.255
            gateway 192.168.0.1
            dns-nameservers 192.168.0.1 8.8.8.8
    # End of Addition
    sudo systemctl restart networking.service
    And test with
    ip add show
    Reboot your RPi again (or do it later if you plan to reboot anyway)
  11. Check for updates & upgrades for Bullseye, but first become root. Don't forget to reboot if kernel patches were installed.
    sudo -i
    apt-get update -y && apt-get upgrade -y
  12. Fix a common issue with Syslog flooding your logs
    sudo sed -i '/# The named pipe \/dev\/xconsole/,$d' /etc/rsyslog.conf
    sudo service rsyslog restart
  13. Alternatively, you could also install Syslog-NG
    sudo apt-get install -y syslog-ng
  14. Install Git
    sudo apt-get install -y git dirmngr
  15. Install Log2Ram as this will allow us to keep logs in memory and reduce the SD card writing significantly. From time to time, the logs are still made persistent to disk.
    cd /home/pi
    git clone https://github.com/azlux/log2ram.git
    cd log2ram
    chmod +x install.sh
    sudo ./install.sh
    Change the log size value to 128M
    sudo vi /etc/log2ram.conf
    Reboot
  16. Install Sendmail and configure to work with a local mail relay server, or alternatively Gmail.
    sudo apt-get install -y sendmail mailutils sendmail-bin
    sudo mkdir -m 700 /etc/mail/authinfo/
    sudo cd /etc/mail/authinfo/
    Create a Sendmail authentication file:
    sudo vi sendmail-auth
    And paste the following info:
    AuthInfo: "U:root" "I:YOUR LOGIN" "P:YOUR PASSWORD"
    Save and exit vi. Next do the makemap:
    sudo makemap hash sendmail-auth < sendmail-auth
    sudo chmod 400 sendmail-auth
    Change the Sendmail configuration now
    sudo vi /etc/mail/sendmail.mc
    Add the following below right above first "MAILER_DEFINITIONS" line:
    # Added by yourname on 2018-XX-XX
    define(`SMART_HOST',`[192.168.Y.XX]')dnl
    define(`RELAY_MAILER_ARGS', `TCP $h 587')dnl
    define(`ESMTP_MAILER_ARGS', `TCP $h 587')dnl
    define(`confAUTH_OPTIONS', `A p')dnl
    TRUST_AUTH_MECH(`EXTERNAL DIGEST-MD5 CRAM-MD5 LOGIN PLAIN')dnl
    define(`confAUTH_MECHANISMS', `EXTERNAL GSSAPI DIGEST-MD5 CRAM-MD5 LOGIN PLAIN')dnl
    FEATURE(`authinfo',`hash -o /etc/mail/authinfo/sendmail-auth.db')dnl
    # End of Addition
    Apply the changes to the configuration and restart Sendmail:
    sudo make -C /etc/mail
    sudo /etc/init.d/sendmail reload
    Test if you can send an email to yourself:
    echo "Just testing my Sendmail email relay" | mail -s "Sendmail email relay" you@here.com
  17. Setup NTP sync
    sudo apt-get install -y ntp ntpdate
    sudo vi /etc/ntp.conf
    And replace the XX with your country code
    0.XX.pool.ntp.org
    sudo /etc/init.d/ntp stop
    And query to see NTP being in sync
    sudo ntpd -gq
    sudo /etc/init.d/ntp start
    sudo ntpd -pn
  18. Setup SNMP
    sudo apt-get install snmp snmpd
    sudo vi /etc/snmp/snmpd.conf
    And put the following configuration lines
    agentAddress udp:161
    rocommunity public 192.168.X.0/24
    Restart your SNMP daemon
    sudo /etc/init.d/snmpd restart
    And test on your local machine
    snmpwalk -Os -c public -v 1 localhost
  19. Setup NFS backup share, install a backup tool, rsnapshot and configure
    Fix rpcbind issue (Make yourself root first)
    su -
    cat >/etc/systemd/system/nfs-common.service <<\EOF
    [Unit]
    Description=NFS Common daemons
    Wants=remote-fs-pre.target
    DefaultDependencies=no
    
    [Service]
    Type=oneshot
    RemainAfterExit=yes
    ExecStart=/etc/init.d/nfs-common start
    ExecStop=/etc/init.d/nfs-common stop
    
    [Install]
    WantedBy=sysinit.target
    EOF

    cat >/etc/systemd/system/rpcbind.service <<\EOF
    [Unit]
    Description=RPC bind portmap service
    After=systemd-tmpfiles-setup.service
    Wants=remote-fs-pre.target
    Before=remote-fs-pre.target
    DefaultDependencies=no
    
    [Service]
    ExecStart=/sbin/rpcbind -f -w
    KillMode=process
    Restart=on-failure
    
    [Install]
    WantedBy=sysinit.target
    Alias=portmap
    EOF

    cat >/etc/tmpfiles.d/rpcbind.conf <<\EOF
    #Type Path        Mode UID  GID  Age Argument
    d     /run/rpcbind 0755 root root - -
    f     /run/rpcbind/rpcbind.xdr 0600 root root - -
    f     /run/rpcbind/portmap.xdr 0600 root root - -
    EOF
    
    systemctl enable rpcbind.service
    systemctl enable nfs-common 
    Install raspiBackup  (from this website)
    sudo mkdir -p /backup 
    Avoid accidental file storage, when folder is not mounted
    And put the following configuration lines
    sudo chattr +i /backup
    sudo vi /etc/fstab 
    And add
    server.yourdomain.com:/volume1/backups/host.yourdomain.com/backup      nfs     rsize=8912,wsize=8912,timeo=14     0       0
    sudo mount /backup
    Now install the raspiBackup tool
    curl -s https://raw.githubusercontent.com/framps/raspiBackup/master/installation/install.sh | sudo bash
    Go through the configuration tool, later on you can go back to it via: raspiBackupInstallUI.sh
    -Backup versions: smart strategy
    -Backup to tar
    -No compression
    -Backup mode standard
    -Email notification set
    Uncomment the crontab (backup will run every Sunday at 5am):
    sudo vi /etc/cron.d/raspiBackup 
    And finally test
    sudo raspiBackup
  20. Generate an SSH keypair for easy login
    ssh-keygen
    ssh-copy-id -p 22 admin@server.yourdomain.com 
    Log into your server, make yourself root and copy the public key into the raspberry
    cat /root/.ssh/id_rsa.pub | ssh user@hhost.yourdomain.com "mkdir -p ~/.ssh && cat >> ~/.ssh/authorized_keys" 
    Test if it's working by using:
    ssh user@host.yourdomain.com 
  21. Setup unattended upgrade based on this tutorial
    sudo apt update
    sudo apt install unattended-upgrades 
    Configure unattended upgrades and uncomment:
    sudo vi /etc/apt/apt.conf.d/50unattended-upgrades
    
    "origin=Debian,codename=${distro_codename}-updates";
    "origin=Debian,codename=${distro_codename}-proposed-updates";
    "origin=Debian,codename=${distro_codename},label=Debian";
    "origin=Debian,codename=${distro_codename},label=Debian-Security";
    "origin=Debian,codename=${distro_codename}-security,label=Debian-Security"; 
    And uncomment:
    Unattended-Upgrade::Remove-Unused-Dependencies "false";
    Now enable Automatic Updates (and press Yes)
    sudo dpkg-reconfigure --priority=low unattended-upgrades
    To view the unattended upgrades:
    sudo systemctl status unattended-upgrades.service
    -


Monday, March 18, 2019

Installing LibreNMS Docker image on Synology

At some point in time when you start having many devices in your home network, and you want to have some insight in things like bandwidth consumption, whether devices are alive, memory usage is ok... You have the need for a monitoring tool. I went for LibreNMS as it seemed user friendly with lots of features that are handy for a low-effort setup like auto-discovery. I went for the docker image from here. There are some excellent blogpost from other bloggers on how to setup this, but I ran into a few issues that I want to share with you. One issue that is still unresolved is running the web UI with https.


  1. Login to your NAS via SSH and make yourself root
  2. Follow the regular step by creating an APP_KEY in base64
  3. Create the MySQL user and database
  4. CREATE DATABASE librenms;
    CREATE USER 'librenms'@'%' IDENTIFIED BY 'yourpassword';
    CREATE USER 'librenms'@'localhost' IDENTIFIED BY 'yourpassword';
    GRANT ALL PRIVILEGES ON librenms.* TO 'librenms'@'%';
    FLUSH PRIVILEGES;
  5. I could only start the container with the following command which does not make use of the UID, GID and SSL config. I choose TCP port 30080 as my Synology is already serving other things over TCP port 80.
  6. docker run \
     -d \
     -h librenms \
     -p 30080:80 \
     -e APP_KEY="base64:your-app-key" \
     -e DB_HOST=192.168.0.Y \
     -e DB_NAME=librenms \
     -e DB_USER=librenms \
        -e TZ=Europe/Amsterdam \
     -e DB_PASS=yourpassword \
     -e BASE_URL=http://192.168.0.X:30080 \
        -e POLLERS=16 \
     -v /volume1/docker/librenms/logs:/opt/librenms/logs \
     -v /volume1/docker/librenms/rrd:/opt/librenms/rrd \
     -v /volume1/docker/librenms/ssl:/opt/librenms/ssl:ro \
     --name librenms \
     jarischaefer/docker-librenms
  7. When the container is started, from the command line you can monitor the logs from the container.
  8. Find the container ID
  9. docker ps
  10. Monitor the logs using the container ID
  11. docker logs container-id
  12. I did see these errors, which seems related to this Docker setup issue explained at Stackoverflow.. As the Docker setup on Synology is somewhat custom and probably prone to errors when you change something, I decided to ignore this.
  13. setfacl: /opt/librenms/bootstrap/cache: Operation not supported
    setfacl: /opt/librenms/logs: Operation not supported
    setfacl: /opt/librenms/rrd: Operation not supported
    ...
    
  14. I also had to remove the UID and GID from the Docker command as this was giving me the following error:
  15. failed to acquire lock schema
  16. So the posted command to launch the Docker container under step 4 is the one that worked for me.
  17. Next, setup the database, create an admin account for your user and login to the container to edit the configuration.
  18. docker exec librenms setup_database
    docker exec librenms create_admin
    docker exec librenms php /opt/librenms/adduser.php admin admin 10 you@here.com
    docker exec -it librenms bash
    Edit the LibreNMS config:
    vi /opt/librenms/conf.d/custom.php
    Set the SNMP community tag:
    $config['snmp']['community'][] = "public";
    $config['nets'][] = '192.168.0.0/24';
    $config['discovery_by_ip'] = true;
    Scan for SNMP devices:
    /opt/librenms/snmp-scan.py -r 192.168.0.0/24
  19. Normally, you should be able now to login into the web UI on http://192.168.0.X:30080. (note the default username/password for LibreNMS is admin:admin)
  20. The next thing I want to do is to figure out how Nginx can help serve LibreNMS over HTTPS with a reverse proxy. The current issue is the fact that base_url is being used as an environmental variable, which is causing all URLs to be always rewritten back to HTTP. No, this is not the expected behaviour. :-)

Monday, March 11, 2019

Making a Wifi router from your RPi and force traffic of your Kodi through it

Sometimes, you can run out of bandwidth in your ethernet connected home network. Yet, connecting to a Wifi hotspot somewhere and serving other devices in your network that are bandwidth intensive (like your Kodi) can overcome this issue.

I have the following devices in scope for this:

  • My regular Internet router is connected through a wired connection (Internal network 192.168.0.0/24)
  • A RPi1 that is connected through eth0 (wired) to the home network (IP 192.168.0.30). It has also a Wifi interface wlan0 that is connected to the public internet.
  • Another RPi2 that is serving Kodi to a TV also connected through eth0 to the home network (IP 192.168.0.40).
RPi1 will be the router that will connect to the Internet through wlan0. RPi2 will be configured to route all of the Internet requests to RPi1 over wired LAN.
Please note that an alternative way to configure Wifi on a RPi (e.g. serving Kodi from OSMC) can be found in this blogpost.
  1. Configure RPi1 to access the Wifi hotspot
    1. Scan your environment for the Wifi network
    2. iwlist wlan0 scan
    3. Edit the Wlan configuration
    4. sudo vi /etc/wpa_supplicant/wpa_supplicant.conf
      Add this config:
      network={
      ssid="ssid"
      scan_ssid=1
      key_mgmt=WPA-EAP
      group=CCMP TKIP
      eap=PEAP
      identity="username"
      password="password"
      phase1="peapver=0"
      phase2="MSCHAPV2"
      }
      
    5. Save and test your config
    6. wpa_cli -i wlan0 reconfigure
    7. Check if your wlan0 device has received an IP address
    8. ifconfig wlan0 or wpa_cli -i wlan0 status
      Output:
      wlan0: flags=-28605  mtu 1500
              inet 151.164.43.34  netmask 255.255.255.0  broadcast 151.164.43.255
              ether b8:27:aa:aa:ff:c1  txqueuelen 1000  (Ethernet)
              RX packets 256109  bytes 319396252 (304.6 MiB)
              RX errors 0  dropped 0  overruns 0  frame 0
              TX packets 187107  bytes 24877570 (23.7 MiB)
              TX errors 0  dropped 0 overruns 0  carrier 0  collisions 0
    9. Install a cron task to regularly reconfigure the wlan0 interface if the Wifi connection gets disconnected
  2. Create a router of your RPi1
    1. vi /etc/iptables/rules.v4
      Add this config:
      *nat
      -A POSTROUTING -s 192.168.0.0/24 -o wlan0 -j MASQUERADE
      COMMIT
      
      *filter
      -A INPUT -i lo -j ACCEPT
      # allow ssh, so that we do not lock ourselves
      -A INPUT -i eth0 -p tcp -m tcp --dport 22 -j ACCEPT
      # allow incoming traffic to the outgoing connections,
      # et al for clients from the private network
      -A INPUT -m state --state NEW,RELATED,ESTABLISHED -j ACCEPT
      -A OUTPUT -p icmp --icmp-type 8 -m state --state NEW,ESTABLISHED,RELATED -j ACCEPT
      -A INPUT -p icmp --icmp-type 0 -m state --state ESTABLISHED,RELATED -j ACCEPT
      # prohibit everything else incoming
      #-A INPUT -i eth0 -j DROP
      COMMIT
    2. Store your config
    3. iptables-restore < /etc/iptables/rules.v4
    4. Check if the rules are in effect
    5. root@hass:~# iptables -L
      Chain INPUT (policy ACCEPT)
      target     prot opt source               destination         
      ACCEPT     all  --  anywhere             anywhere            
      ACCEPT     tcp  --  anywhere             anywhere             tcp dpt:ssh
      ACCEPT     all  --  anywhere             anywhere             state NEW,RELATED,ESTABLISHED
      ACCEPT     icmp --  anywhere             anywhere             icmp echo-reply state RELATED,ESTABLISHED
      
      Chain FORWARD (policy ACCEPT)
      target     prot opt source               destination         
      
      Chain OUTPUT (policy ACCEPT)
      target     prot opt source               destination         
      ACCEPT     icmp --  anywhere             anywhere             icmp echo-request state NEW,RELATED,ESTABLISHED
      
  3. On your RPi2 add a static route to use RPi1 as the gateway for Internet traffic
    1. Test what external IP is being used on RPi2
    2. root@kodi1:/lib# curl ifconfig.me
      64.160.13.75
    3. Add the route
    4. route add -net default gw 192.168.0.30 netmask 0.0.0.0 dev eth0
    5. Test for your externalIP again, it should be different now
    6. root@kodi1:/lib# curl ifconfig.me
      151.164.43.34
    7. Also test if you can ping to www.google.com from RPi2
    8. Now all Internet traffic on RPi2 (192.168.0.40) will be routed through RPi1 (192.168.0.30)
    9. root@kodi1:~# route -n
      Kernel IP routing table
      Destination     Gateway         Genmask         Flags Metric Ref    Use Iface
      0.0.0.0         192.168.0.30    0.0.0.0         UG    0      0        0 eth0
      192.168.0.0     0.0.0.0         255.255.255.255 UH    0      0        0 eth0
      192.168.0.0     0.0.0.0         255.255.255.0   U     0      0        0 eth0

Saturday, February 9, 2019

Unifi: set a local hostname to resolve to the local IP inside your home network


When you want to access a local server in your home network, it's handy to use domain names for that. Unfortunately, in some cases, the same server has a public and private IP both sharing the same domain name. Thus, defining them in your public DNS with your public IP, could make it impossible to access the same server locally. Still, if you want to use the FQDN instead of the IP name, you can define the domain name with local IP in your Unifi Security Gateway.
  1. Login via SSH to your Unifi (SG) and enter your admin password.
  2. ssh -l admin 192.168.x.1
  3. Switch to become root
  4. sudo -i
  5. Edit the hosts file and add an entry for the local server
  6. vi /etc/hosts
    192.168.x.10     yourserver.domain.name
  7. Test on another machine if the domain name gets resolved as expected
  8. MacBook-Pro:~ user$ nslookup host.domain.name
    Server:  192.168.x.1
    Address: 192.168.x.1#53
    
    Name: host.domain.name
    Address: 192.168.x.10


Friday, March 23, 2018

Renew your Let's Encrypt certificate

You are using a Let's Encrypt certificate, but get the warning that it will expire. These are the quick steps to renew it.

  1. Adapt your DNS and point it for the domain to your public IP (if it is currently pointing to an internal IP e.g. 192.168.Y.X)
  2. Enable port forwarding for port 80/443 for this internal IP
  3. Run the renewal
    sudo certbot renew
  4. If successful, disable the port forwarding again
  5. Change the DNS again

      Sunday, February 11, 2018

      Pihole docker change or remove password

      Below the steps to change or remove your Pihole admin password.

      Login to your Docker host, next get a Docker shell:
      docker exec -it pihole /bin/bash
      Set a password for your pihole web interface
      pihole -a -p somepasswordhere
      You could also remove the password by not passing an argument
      pihole -a -p

      Tuesday, February 6, 2018

      Installing (and updating) Unifi Controller as a docker image on your Synology NAS

      Prerequisites


      • Make sure you log in to DSM on your NAS as an admin user.
      • Docker must be installed on your NAS. If It isn’t, go to "Package Center", select "Utilities" and look for "Docker" under the "Third-party" heading and add the package to your NAS (if Docker is not available for your NAS, this HOWTO is not for you).

      Installation

      1. In the (DSM) Main menu, choose "Docker".
      2. Click on "Registry" and search for "unifi". Select the "jacobalberty/unifi" entry and click "Download". Select the "stable" branch.
      3. When the image is downloaded, it’ll show up under "Image", on this page select it and click "Launch". Note that it can take a while to finish the download, DSM will show a "system event" notification when download is completed.
      4. Give the controller a container name you like (or accept the default) and click on "Advanced Settings".
      5. In the first tab "General settings", check "Enable auto-restart"
      6. In the tab "Volume", click "Add Folder"
      7. Select "docker", click on "Create folder", name it "unifi" and click OK. Select it and click "Select"
      8. Under "mount path", enter "/unifi". Later on, you will see that subfolders data and log will be created. A subfolder folder cert can be manually created to host your SSL certificate.

      9. In the tab "Network", check "Use the same network as Docker Host". Click "Apply" and click on "Next" and after that on "Apply".
      10. Start your container and check the settings by selecting the running container and clicking on "Details".

      Updating

      1. In the DSM Main menu, choose "Docker".
      2. Click on "Registry" and search for "unifi". Select the "jacobalberty/unifi" image and click "Download". Select the branch you installed before ("stable" is the branch you should choose). Wait until the download completes (DSM will show a "system event" notification when download has completed)
      3. Click on "Container", select the UniFi Controller container and subsequently:
        1. Stop the container (flip the on-off switch you see) and wait till the status of the container changes to "Stopped".
        2. Click the "Action" button and select "Clear".
        3. Start the container (flip the on-off switch you see) and wait till the status of the container changes to "Running".
      That’s it! The new version of Unifi Controller should be running now.

      Unifi controller docker image not working on Synology until...

      I wanted to install a docker image into a running container using the fine work done by Jacob Alberty. And follow these steps. Unfortunately, I could not access the website on https://yournasip:8443. I was pulling my hairs out as I could see that the container was running, TCP IP4/6 ports were open, yet I could not access any website. I double checked that my firewall on the NAS was not blocking traffic, but that was not the case. I therefore reverted to starting the container from the command line. (Please note that I ommited the --init flag, as this flag (from 1.13 onwards) is not yet supported on the Docker version on my Synology (1.11.2).)

      docker run --rm -p 3478:3478/udp -p 6789:6789/udp -p 8080:8080 \
      -p 8443:8443 -p 8843:8843 -p 8880:8880 -p 10001:10001/udp -e TZ='Europe/Paris' \
      -v /volume1/docker/unifi:/unifi --name unifi jacobalberty/unifi:stable

      And tadaaa! Suddenly, I was able to access the Unifi Controller again. But when I stopped the command on the command line, the container would stop. So I needed a little trick.

      1. Start the docker container from the command line through an SSH session in the terminal.
      2. Verify that you can access the Unifi Controller
      3. Go to DSM and login, start the Docker app
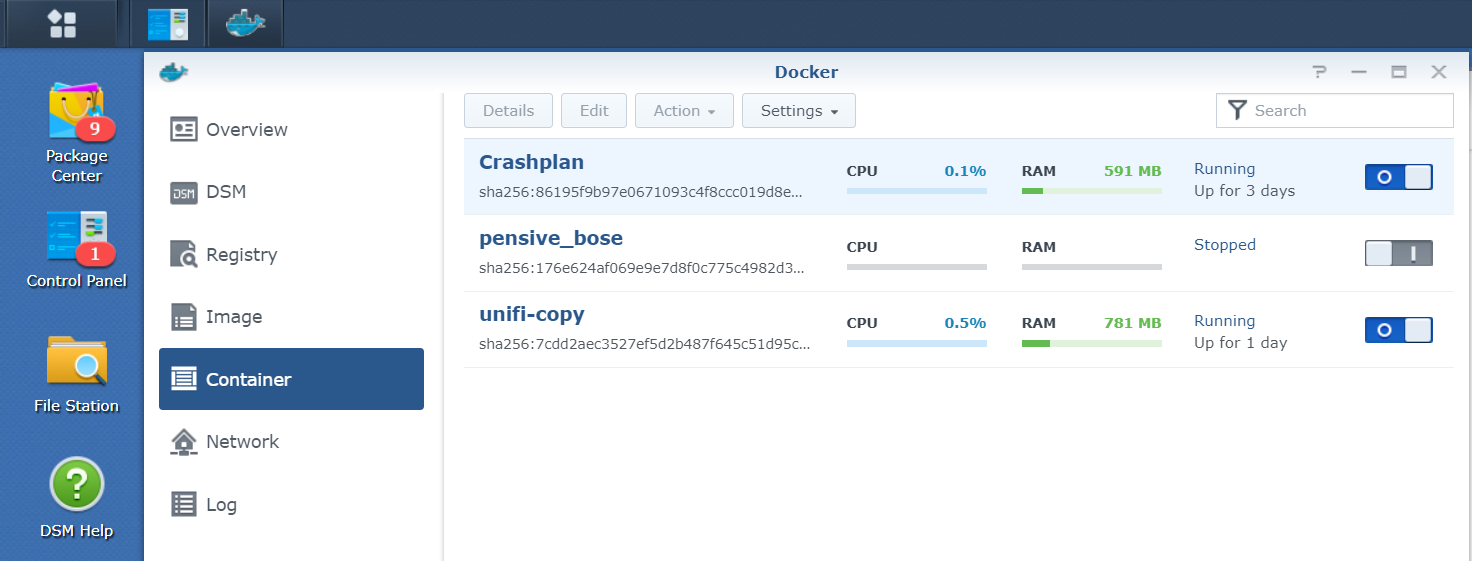
      4. Click on 'Container' and identify the unifi container. Right-click it, go to Settings and then Duplicate Settings. A copy container will be made, named unifi-copy.
      5. Kill the docker command from the terminal. But now you have a second copy.
      6. Tweak and configure the copy container as you like and start it from the DSM.

      Alternatively, you could also use the -d option as per documentation.
      --detach , -dRun container in background and print container ID

      Tuesday, November 14, 2017

      Make your Raspberry Pi read-only for reducing SD wear/corruption

      Everyone using Raspberry Pi's knows that SD cards are actually not made to serve as storage, especially when storage intensive applications (e.g. database, log server...) are being put in-there. To limit this SD wearing (which will lead to SD  corruption at some point), you can put Raspian in a read-only mode and only swith to read-write when really needed.

      All kudos go to this blog for the excellent write up. I assume you have an RPi3 with Wheezy installed onto it. All commands are executed as root.

      Update your RPi

      Make yourself root, update your Raspian and reboot.
      su -
      apt-get update && apt-get upgrade
      reboot

      Remove some unwanted packages

      apt-get remove --purge wolfram-engine triggerhappy anacron dphys-swapfile xserver-common lightdm
      insserv -r x11-common; apt-get autoremove --purge
      Replace the Rsyslog with the Busybox one
      apt-get install busybox-syslogd; dpkg --purge rsyslog

      Disable swap and filesystem check and set it to read-only

      Edit the file: /boot/cmdline.txt and add the three words
      fastboot noswap ro

      Move some system files to the temp filesystem

      rm -rf /var/lib/dhcp/ /var/run /var/spool /var/lock /etc/resolv.conf
      ln -s /tmp /var/lib/dhcp
      ln -s /tmp /var/run
      ln -s /tmp /var/spool
      ln -s /tmp /var/lock
      touch /tmp/dhcpcd.resolv.conf; ln -s /tmp/dhcpcd.resolv.conf /etc/resolv.conf

      Change the dhcpd lock file to the temp filesystem
      vi /etc/systemd/system/dhcpcd5
      And be sure to change the line with PIDFile=/run/dhcpcd.pid to PIDFile=/var/run/dhcpcd.pid

      On Debian Jessie and Wheezy move random-seed to a writable location
      rm /var/lib/systemd/random-seed
      ln -s /tmp/random-seed /var/lib/systemd/random-seed
      Since this file is on tmpfs, it will not be created upon reboot, but we can still do this with some magic of the systemd system service.
      To create file on the tmp area at bootup before starting the random-seed service, just edit the file service file to add a pre-command to execute:
      vi /lib/systemd/system/systemd-random-seed.service
      Add the line: ExecStartPre=/bin/echo "" >/tmp/random-seed under the service section.

      Do not use touch instead of echo, it won’t work because we'll be checking a read-only filesystem.
      Execute the following to tell systemd we made changes.
      systemctl daemon-reload

      Setup the Internet clock sync

      If (still) needed install NTP
      apt-get install ntp
      And be sure to configure your time zone, with raspi-config tool.
      raspi-config
      Then go to menu "Internationalisation Options" and change "Change Timezone" and select your time zone.

      Edit the hourly cron script that saves the clock every hour

      vi /etc/cron.hourly/fake-hwclock
      And change it to allow saving the clock.
      #!/bin/sh
      #
      # Simple cron script - save the current clock periodically in case of
      # a power failure or other crash
      
      if (command -v fake-hwclock >/dev/null 2>&1) ; then
        mount -o remount,rw /
        fake-hwclock save
        mount -o remount,ro /
      fi

      Edit the file /etc/ntp.conf and set to redirect driftfile to the writable zone /var/tmp
      vi /etc/ntp.conf

      Remove some startup scripts and edit fstab

      insserv -r bootlogs; insserv -r console-setup
      Edit fstab and add the ro option. Add the tmpfs parts as well.
      vi /etc/fstab

      tmpfs           /tmp            tmpfs   nosuid,nodev            0       0
      tmpfs           /var/log        tmpfs   nosuid,nodev            0       0
      tmpfs           /var/tmp        tmpfs   nosuid,nodev            0       0

      Reboot

      reboot

      If all went fine, you're pi will be up again. Test if the filesystem is read-only now.

      Switching from read-only mode to read-write and back

      Now you’re in read-only mode, it’s fine and safe, but if you need to install, write or modify files, upgrade, or whatever that need write access, you'll need to be able to do this.

      To set system to read-write:
      mount -o remount,rw /
      And to set it back to read-only:
      mount -o remount,ro /
      If you want to have two simple commands like: ro for setting mode to read-only and: rw to enable read-write mode. I also want to know on which mode I am in, on the command prompt.

      Add fancy indicating features

      Edit the file bash.bashrc
      vi /etc/bash.bashrc
      At the end add the following lines:
      # set variable identifying the filesystem you work in (used in the prompt below)
      set_bash_prompt(){
          fs_mode=$(mount | sed -n -e "s/^\/dev\/.* on \/ .*(\(r[w|o]\).*/\1/p")
          PS1='\[\033[01;32m\]\u@\h${fs_mode:+($fs_mode)}\[\033[00m\]:\[\033[01;34m\]\w\[\033[00m\]\$ '
      }
      
      alias ro='sudo mount -o remount,ro / ; sudo mount -o remount,ro /boot'
      alias rw='sudo mount -o remount,rw / ; sudo mount -o remount,rw /boot'
      
      # setup fancy prompt"
      PROMPT_COMMAND=set_bash_prompt

      Execute this new file and look at the magic! The prompt has changed and shows the file system mode.
      . /etc/bash.bashrc
      Test by typing ro or rw to switch between modes.

      Use logout to save history and force read-only mode

      To be sure to avoid setting back to read-only at logout, add the following line to the file
      /etc/bash.bash_logout. (maybe you'll need to create it)
      vi /etc/bash.bash_logout
      Add:
      mount -o remount,rw /
      history -a
      fake-hwclock save
      mount -o remount,ro /
      mount -o remount,ro /boot


      Tuesday, February 28, 2017

      Installing Unifi Controller as a Docker container on Synology


      Having Ubiquiti UniFi access points in your house is a great way to serve a meshed Wifi network. With a Synology NAS and DSM6, it's very easy now to run the UniFi Controller in a Docker container. Link to the docker image: https://hub.docker.com/r/jacobalberty/unifi/
      These tutorials will greatly help you with that: miketabor.com and kapsi.fi. There's a few tweaks I had to make:
      Change the container config and add UDP port 10001:10001
      Make sure your firewall rules on your NAS are properly adapted (take the 10001/udp into account as well)

      If you have deployed a UniFi Controller on a different system/instance before, make sure that you adopt the device on your new Controller by doing the following steps:
      SSH login to your access point (access_point_ip:22) with credentials of the previous controller (e.g. administrator:yoursecretpass)
      Now execute the following commands:
      #mca-cli
      #set-inform synology_nas_ip:8080/inform

      Now you should see your device into your new Controller instance and you're good to go!

      Sunday, February 26, 2017

      Installing Entware onto Synology DSM6

      You might run into the situation where you need to install an external package onto your DSM6. Entware is the way to go as a ton of packages are available. The steps to do are well listed here. Make sure you're root (sudo su -) before executing them.

      Usage as per below:

      # opkg update
      Downloading http://pkg.entware.net/binaries/mipsel/Packages.gz.
      Updated list of available packages in /opt/var/opkg-lists/entware-ng.
      
      # opkg list transmission*
      transmission-cli - 2.84-4 - CLI utilities for transmission.
      transmission-daemon - 2.84-4 - Transmission is a simple BitTorrent client.
      It features a very simple, intuitive interface
      on top on an efficient, cross-platform back-end.
      This package contains the daemon itself.
      transmission-remote - 2.84-4 - CLI remote interface for transmission.
      transmission-web - 2.84-4 - Webinterface resources for transmission.
      
      # opkg install transmission-web
      Installing transmission-web (2.84-4) to root...
      Downloading http://pkg.entware.net/binaries/mipsel/transmission-web_2.84-4_mipselsf.ipk.
      Installing transmission-daemon (2.84-4) to root...
      Downloading http://pkg.entware.net/binaries/mipsel/transmission-daemon_2.84-4_mipselsf.ipk.
      ...

      Tuesday, February 14, 2017

      Installing Crashplan docker image to Xpenology or Synology

      Following the excellent tutorial by Mike Tabor, the only difference to my setup, was the need to change my local config for this location: C:\Users\username\AppData\Local\CrashPlan\.ui_info instead of the mentioned one.


      Sunday, February 12, 2017

      Building custom Linux kernel (howto)

      Just summarizing what I did to build my own custom Debian Linux kernel. As I needed a few modules which where not shipped in the standard Debian kernel. All is based on this tutorial which I ran on a Debian 8.6 with 3.16 kernel. Make sure you're root.

      mkdir /root/custom-kernel
      cd /root/custom-kernel
      apt-get install fakeroot linux-source-3.16 kernel-package libncurses5-dev
      tar xf /usr/src/linux-source-3.16.tar.xz
      cd linux-source-3.16
      make menuconfig
      make-kpkg clean
      fakeroot make-kpkg --initrd --revision=001
      dpkg -i linux-image-3.16.39_001_i386.deb
      shutdown -r now

      Tuesday, January 10, 2017

      Installing SSLH onto Synology DSM6 or DSM7 for easy HTTPS, OpenVPN and SSH through corporate firewall

      When you are in a corporate LAN, access to the outside is often restricted. HTTPS is allowed, yet other applications like SSH or OpenVPN might not be. As well, you want to run several of these services onto your Synology box. Choosing which one will use TCP port 443 could be a hard judgement to make. Luckily, there is SSLH to the rescue.

      Note: with DSM7, it is no longer possible by default to open port 443 (which is below 1024) with the provided user (sh-sslh). You will get a "0.0.0.0:https:bind: Permission denied" error when changing port 30000 to 443. The fix is to change your portforwarding in your router to NAS_IP:30000 instead. The below tutorial was making the SSLH service listen to port 443 with the other services running on localhost:443.

       As a consequence, changing the sslh.cfg file and the NGINX files is no longer needed, so everything below can be ignorred.

      Caution! Playing around with your SSL port could possibly break the access to your DSM if nginx fails to restart.
      Therefore, I strongly recommend the following actions:

      • Never put your SSH server to listen ONLY onto 127.0.0.1. Never.
      • Never change all of your services (HTTPS, SSH, OpenVPN) at the same time, unless your 100% sure your config is correct.
      • Open up temporarily the Telnet service, just in case
      • Make sure you don't lock yourself out with your firewall rules onto your Synology
      • Backup the original config files before starting making changes. cp -p config.file config.file.ori will do.

      0. Make sure you have the Synocommunity repository installed under your Package Center. Open up an SSH connection to your Synology and make yourself root.
      1. Download and install the SSLH package. By default, the configuration file is at /usr/local/sslh/var/sslh.cfg and needs to be adapted. Make a backup copy of the file first.
      2. Go to your terminal and edit the file with vi
      vi /usr/local/sslh/var/sslh.cfg
      3. Change the IP address (under host: "0.0.0.0") to your IPv4 address of the Synology. Do NOT yet change the port. Leave it onto 30000 as default.
      4. Check if the services listed are using the correct port numbers and adapt if needed. Save the file.
      5. Now go to the Package Center of DSM again and stop and start SSLH.
      6. Go to your terminal and verify if SSLH is running properly by running the command:
      netstat -an | grep 30000
      Expected output:
      root@server:/# netstat -an | grep 30000
      tcp        0      0 192.168.0.5:30000       0.0.0.0:*               LISTEN
      7. Check if HTTPS is currently running and listening to the IPv4 address:
      netstat -an | grep 443
      Expected output:
      root@server:/# netstat -an | grep 443
      tcp        0      0 0.0.0.0:443           0.0.0.0:*               LISTEN
      tcp6       0      0 :::443                  :::*                    LISTEN
      This now means that nginx is still listening onto the IPv4 address for HTTPS. Let's change that.
      8. Open your web browser and browse to your Synology IP for both HTTP as for HTTPS: http://yourip and https://yourip
      Confirm that this is working properly.
      9. Go to the nginx config directory (/usr/syno/share/nginx) and backup the following files: DSM.mustache, WWWService.mustache and server.mustache
      10. Use vi to change nginx from listening to 0.0.0.0:443 to 127.0.0.1:443 only, by making it look like this:
      listen 127.0.0.1:443

      DSM.mustache
      WWWService.mustache
      server.mustache
      Repeat this for all 3 files and save your changes.
      11. Restart nginx from the command line:
      synoservicecfg --restart nginx
      You can monitor into /var/log/synoservice.log if things restarted properly. Typical output should be:
      2017-01-10T19:04:33+01:00 server synoservicecfg: service_restart.c:21 synoservice: restart [nginx] ...
      2017-01-10T19:04:34+01:00 server synoservicecfg: service_restart.c:52 synoservice: finish restart [nginx].
      12. Verify that HTTPS is only listening onto localhost (127.0.0.1)
      root@server:/usr/syno/share/nginx# netstat -an | grep 443
      tcp        0      0 127.0.0.1:443           0.0.0.0:*               LISTEN
      tcp6       0      0 :::443                  :::*                    LISTEN
      13. Refresh the browser screen for your HTTPS. It should not show any website anymore.
      14. As a final step, change your SSLH config file and set the port to listen from 30000 to 443. Restart SSLH in the Package Center by doing a stop and start. Or do it command line:
      synoservicecfg --restart pkgctl-sslh
      15. Verify that SSLH is now listening onto your IPv4 address with port 443.
      root@server:/usr/syno/share/nginx# netstat -an | grep 443
      tcp        0      0 192.168.0.5:443         0.0.0.0:*               LISTEN
      tcp        0      0 127.0.0.1:443           0.0.0.0:*               LISTEN
      tcp6       0      0 :::443                  :::*                    LISTEN
      
      16. You can test your HTTPS, OpenVPN and SSH. All should perfectly route through the SSLH multiplexer.


      Thursday, December 1, 2016

      Install Louie for Python3

      I needed Louie for a Python3 script, but it is not available through apt-get. To install directly from the github, just use the following command which makes use of pip3.

      pi@raspberrypi:~ $ sudo pip3 install git+git://github.com/11craft/louie.git

      In order to check for the installed modules in your python3 installation:
      >>> import pip
      >>> installed_packages = pip.get_installed_distributions()
      >>> installed_packages_list = sorted(["%s==%s" % (i.key, i.version)
      ...      for i in installed_packages])
      >>> print(installed_packages_list)
      ['babel==2.3.4', 'flask-babel==0.9', 'flask-socketio==2.8.1', 'flask-themes==0.1.3', 'flask-wtf==0.9.5', 'flask==0.10.1', 'gevent-socketio==0.3.6', 'gevent-websocket==0.9.5', 'gevent==1.1.1', 'greenlet==0.4.10', 'itsdangerous==0.24', 'libopenzwave==0.3.1', 'louie==1.2a1dev', 'nose==1.3.7', 'openzwave==0.3.1', 'pydispatcher==2.0.5', 'pyozwman==0.3.1', 'pyozwweb==0.3.1', 'python-engineio==1.1.0', 'python-socketio==1.6.1', 'pytz==2016.7', 'pyyaml==3.12', 'six==1.10.0', 'speaklater==1.3', 'urwid==1.3.1', 'virtualenv==15.1.0', 'webob==1.7.0rc1', 'werkzeug==0.11.11', 'wtforms==1.0.5']