Showing posts with label synology. Show all posts

Thursday, November 14, 2024

Update Home Assistant docker installation

In order to safely update your docker container in a Synology NAS. I assume you manage your docker containers via docker-compose

  1. List the running containers
    docker ps
  2. Go to the docker folder
    cd /volume1/docker
  3. Copy the configuration (if needed)
    cp -rp ha /volume2/backups/ha-bak.25.x
  4. Stop the container
    docker stop homeassistant
  5. Make a backup
    docker commit homeassistant homeassistant-backup:version-25.x
  6. Pull the latest image
    docker pull ghcr.io/home-assistant/home-assistant:stable

    or if you want a specific version
    docker pull ghcr.io/home-assistant/home-assistant:2024.11.3
  7. Remove the container
    docker rm homeassistant
  8. If you have a specific version to use, edit the version of the image in the docker-compose file to the downloaded one (2024.11.3, default is stable)
    vi docker-compose.yaml
  9. Start up the new container
    docker-compose --verbose up -d homeassistant

Checklist afterwards:

  • Check if configuration is loaded correctly:
    docker exec homeassistant python -m homeassistant --script check_config --config /config
  • Check for version: Settings > About
  • Check for logs: Settings > System > Logs
  • Update HACS plugins if needed
For a full recovery of a container:
  1. Stop and Remove the Current Container:
    docker stop homeassistant

    docker rm homeassistant
  2. Run a New Container from the Backup Image (or edit your docker-compose.yaml and start with docker-compose):
    docker run -d --name homeassistant \ --restart=unless-stopped \ -v /volume1/docker/ha:/config \ -e TZ=Europe/Paris \ --net=host \ homeassistant-backup:version-24.11


Thursday, September 21, 2023

Watchtower not working on Synology DSM 6.0.x as a Docker container

When installing the standard Watchtower container onto DSM 6.0 with Docker, I ran into 2 issues which caused the container not to run and constantly restart itself (see container logs for the error messages):

  1. Cannot connect to the Docker daemon at unix:///var/run/docker.sock. Is the docker daemon running?
  2. Error response from daemon: client is newer than server (client API version: 1.24, server API version: 1.23

Both issues have a solution. First being that an older docker image has to be used, second being that DSM UI somewhere filters out a file mapping when creating the container.

Fix for issue 1: Create a symlink

sudo ln -s /var/run/docker.sock /volume1/docker/docker.sock

Fix for issue 2: Create a new docker container

sudo docker run -d --name watchtower-new -v /volume1/docker/docker.sock:/var/run/docker.sock centurylink/watchtower --interval 82800 --cleanup

Thanks to these links for finding a solution

Friday, August 2, 2019

Renew your wildcard certificate on your DSM Webstation and OpenVPN server

Are you having a wildcard (*.yourdomain.com) SSL certificate that is expiring and needs a renewal? Below are the steps to take to renew it on a Synlogy DSM. I also use the certificate for the OpenVPN server on the DSM. So I need to update it twice.

Convention:

  • Certificate: server.crt
  • Private key: server.key
  • Intermediate: ca_bundle.crt
  • Root: ca.crt


Receive a new wildcard certificate

  • Login in DSM https://ip:5001
  • SSH into the DSM
  • cd /usr/syno/etc/packages/VPNCenter/openvpn/keys
  • copy the ca_bundle.crt file
  • In the DSM: Control Panel > Security > Certificate
  • Click on CSR, then renew certificate
  • Select the Country and download CSR and the private key.
  • Go to ssl2buy.com to buy a new wildcard certificate from alphassl.com
  • Enter the CSR (generated by your DSM) and select approval method admin@yourdomain.com
  • Go to your webmail and login with the admin@yourdomain.com account to check for the email to approve your new purchase
  • Click on the approval email request to issue out the certificate (you get an email with the certificate from ssl2buy)
  • Add a new certificate by entering the server.key, server.crt and ca_bundle.crt files in the wizard
  • Click on Edit to set the new certificate as the Default one, then remove the old (inactive) one. The webserver should restart itself now with the new certificate
Tip: The intermediate certificate (in base64 format) from AlphaSSL can be downloaded here


Update the certificates for the OpenVPN server

  • SSH into the DSM and make yourself root
  • sudo -i
    cd /usr/syno/etc/packages/VPNCenter/openvpn/keys
  • Make a new folder for the last time you created/renewed your certificate under "history" directory. Move the (old) certificates there to as a backup.
  • mkdir history/YYYY-MM-DD
    mv server.* history/YYYY-MM-DD
    cp -rp ca* history/YYYY-MM-DD
  • Add the new private key, certificate and intermediate by doing vi server.key ... Do this for the 2 server files mentioned under Convention.
  • Make the files owner readable only
  • chmod 400 server*
    chmod 400 ca*
  • Restart the OpenVPN server
  • /var/packages/VPNCenter/target/scripts/openvpn.sh restart


And you should be good to go for another year...

Monday, March 18, 2019

Installing LibreNMS Docker image on Synology

At some point in time when you start having many devices in your home network, and you want to have some insight in things like bandwidth consumption, whether devices are alive, memory usage is ok... You have the need for a monitoring tool. I went for LibreNMS as it seemed user friendly with lots of features that are handy for a low-effort setup like auto-discovery. I went for the docker image from here. There are some excellent blogpost from other bloggers on how to setup this, but I ran into a few issues that I want to share with you. One issue that is still unresolved is running the web UI with https.


  1. Login to your NAS via SSH and make yourself root
  2. Follow the regular step by creating an APP_KEY in base64
  3. Create the MySQL user and database
  4. CREATE DATABASE librenms;
    CREATE USER 'librenms'@'%' IDENTIFIED BY 'yourpassword';
    CREATE USER 'librenms'@'localhost' IDENTIFIED BY 'yourpassword';
    GRANT ALL PRIVILEGES ON librenms.* TO 'librenms'@'%';
    FLUSH PRIVILEGES;
  5. I could only start the container with the following command which does not make use of the UID, GID and SSL config. I choose TCP port 30080 as my Synology is already serving other things over TCP port 80.
  6. docker run \
     -d \
     -h librenms \
     -p 30080:80 \
     -e APP_KEY="base64:your-app-key" \
     -e DB_HOST=192.168.0.Y \
     -e DB_NAME=librenms \
     -e DB_USER=librenms \
        -e TZ=Europe/Amsterdam \
     -e DB_PASS=yourpassword \
     -e BASE_URL=http://192.168.0.X:30080 \
        -e POLLERS=16 \
     -v /volume1/docker/librenms/logs:/opt/librenms/logs \
     -v /volume1/docker/librenms/rrd:/opt/librenms/rrd \
     -v /volume1/docker/librenms/ssl:/opt/librenms/ssl:ro \
     --name librenms \
     jarischaefer/docker-librenms
  7. When the container is started, from the command line you can monitor the logs from the container.
  8. Find the container ID
  9. docker ps
  10. Monitor the logs using the container ID
  11. docker logs container-id
  12. I did see these errors, which seems related to this Docker setup issue explained at Stackoverflow.. As the Docker setup on Synology is somewhat custom and probably prone to errors when you change something, I decided to ignore this.
  13. setfacl: /opt/librenms/bootstrap/cache: Operation not supported
    setfacl: /opt/librenms/logs: Operation not supported
    setfacl: /opt/librenms/rrd: Operation not supported
    ...
    
  14. I also had to remove the UID and GID from the Docker command as this was giving me the following error:
  15. failed to acquire lock schema
  16. So the posted command to launch the Docker container under step 4 is the one that worked for me.
  17. Next, setup the database, create an admin account for your user and login to the container to edit the configuration.
  18. docker exec librenms setup_database
    docker exec librenms create_admin
    docker exec librenms php /opt/librenms/adduser.php admin admin 10 you@here.com
    docker exec -it librenms bash
    Edit the LibreNMS config:
    vi /opt/librenms/conf.d/custom.php
    Set the SNMP community tag:
    $config['snmp']['community'][] = "public";
    $config['nets'][] = '192.168.0.0/24';
    $config['discovery_by_ip'] = true;
    Scan for SNMP devices:
    /opt/librenms/snmp-scan.py -r 192.168.0.0/24
  19. Normally, you should be able now to login into the web UI on http://192.168.0.X:30080. (note the default username/password for LibreNMS is admin:admin)
  20. The next thing I want to do is to figure out how Nginx can help serve LibreNMS over HTTPS with a reverse proxy. The current issue is the fact that base_url is being used as an environmental variable, which is causing all URLs to be always rewritten back to HTTP. No, this is not the expected behaviour. :-)

Sunday, February 10, 2019

Unifi Controller: setup a new instance and restore a backup

I tried to upgrade my Docker container with the Unifi Controller (UC) on my Synology. Unfortunately, upgrading from 5.6 to 5.10 is actually not supported and I ended up with a corrupted database. I therefore, created a new container from the latest stable image (5.10.12) and had a few hickups in between.

  1. I did not have a good backup of the MongoDB for version 5.6
  2. Always have good backups.
  3. I got I/O exception (java.net.ConnectException) caught when processing request...
  4. It turned out that I had already my SSL certificate placed inside the /unifi/cert folder, which caused this error. The /unifi data, logs and cert folder must thus be empty when you first start the container. Later on, you can update your certificates. Don't forget to restart the container when you do.
  5. The container (version 5.10) crashed when I restored a UC autobackup for version 5.6
  6. A restart and some patience for the system to come back on, helped this. A re-adoption of the devices was needed. I also upgraded the firmware of all my devices.

Synology: ports already in use error message in DSM when creating a new Docker container

If you happen to create a new container, for a same service (e.g. new Unifi Controller with latest version), you could happen to run into the issue where the same ports cannot be used again, due to a check that DSM is performing. It could also be the case that the config file for this does not get deleted. The solution is to manually move or delete the file for the time being.


  1. Start looking for the port that is reported as already in use (in my case it was 10001)
  2. grep -Rl "10001" /usr | grep docker
  3. Go to the folder where the port reservations for services are kept
  4. cd /usr/local/etc/services.d/
    Output:
    root@server:/usr/local/etc/services.d# ls -l
    total 36
    -rw-r--r-- 1 root root 395 Mar  4  2017 AudioStation.sc
    -rw-r--r-- 1 root root  98 Dec 13 08:52 CloudStation.sc
    -rw-r--r-- 1 root root 109 Dec 30 12:48 docker_trusting_boyd.sc
    -rw-r--r-- 1 root root 109 Feb 08 12:48 docker_unifi.sc
    -rw-r--r-- 1 root root 178 Mar  4  2017 iTunesServer.sc
    -rw-r--r-- 1 root root 688 Feb  9 14:53 MailServer.sc
    -rw-r--r-- 1 root root 105 Apr 18  2017 ProxyServer.sc
    -rwxr-xr-x 1 root root 250 Jan  1  2017 SurveillanceStation.sc
    -rw-r--r-- 1 root root 426 Mar 11  2018 synovpn_port
    -rw-r--r-- 1 root root 262 Apr 14  2017 VideoStation.sc
  5. Move the corresponding file or delete it

Sunday, March 11, 2018

Send yourself a test mail from your Synology command line

If you quickly need to test if your Sendmail config is working properly on your Synology, just use the below commands.

sendmail -F "Synology Station" -f "you@here.com" -t you@here.com << EOF
Subject: Synology Mail Test
All working fine.
EOF

Tuesday, February 6, 2018

Installing (and updating) Unifi Controller as a docker image on your Synology NAS

Prerequisites


  • Make sure you log in to DSM on your NAS as an admin user.
  • Docker must be installed on your NAS. If It isn’t, go to "Package Center", select "Utilities" and look for "Docker" under the "Third-party" heading and add the package to your NAS (if Docker is not available for your NAS, this HOWTO is not for you).

Installation

  1. In the (DSM) Main menu, choose "Docker".
  2. Click on "Registry" and search for "unifi". Select the "jacobalberty/unifi" entry and click "Download". Select the "stable" branch.
  3. When the image is downloaded, it’ll show up under "Image", on this page select it and click "Launch". Note that it can take a while to finish the download, DSM will show a "system event" notification when download is completed.
  4. Give the controller a container name you like (or accept the default) and click on "Advanced Settings".
  5. In the first tab "General settings", check "Enable auto-restart"
  6. In the tab "Volume", click "Add Folder"
  7. Select "docker", click on "Create folder", name it "unifi" and click OK. Select it and click "Select"
  8. Under "mount path", enter "/unifi". Later on, you will see that subfolders data and log will be created. A subfolder folder cert can be manually created to host your SSL certificate.

  9. In the tab "Network", check "Use the same network as Docker Host". Click "Apply" and click on "Next" and after that on "Apply".
  10. Start your container and check the settings by selecting the running container and clicking on "Details".

Updating

  1. In the DSM Main menu, choose "Docker".
  2. Click on "Registry" and search for "unifi". Select the "jacobalberty/unifi" image and click "Download". Select the branch you installed before ("stable" is the branch you should choose). Wait until the download completes (DSM will show a "system event" notification when download has completed)
  3. Click on "Container", select the UniFi Controller container and subsequently:
    1. Stop the container (flip the on-off switch you see) and wait till the status of the container changes to "Stopped".
    2. Click the "Action" button and select "Clear".
    3. Start the container (flip the on-off switch you see) and wait till the status of the container changes to "Running".
That’s it! The new version of Unifi Controller should be running now.

Unifi controller docker image not working on Synology until...

I wanted to install a docker image into a running container using the fine work done by Jacob Alberty. And follow these steps. Unfortunately, I could not access the website on https://yournasip:8443. I was pulling my hairs out as I could see that the container was running, TCP IP4/6 ports were open, yet I could not access any website. I double checked that my firewall on the NAS was not blocking traffic, but that was not the case. I therefore reverted to starting the container from the command line. (Please note that I ommited the --init flag, as this flag (from 1.13 onwards) is not yet supported on the Docker version on my Synology (1.11.2).)

docker run --rm -p 3478:3478/udp -p 6789:6789/udp -p 8080:8080 \
-p 8443:8443 -p 8843:8843 -p 8880:8880 -p 10001:10001/udp -e TZ='Europe/Paris' \
-v /volume1/docker/unifi:/unifi --name unifi jacobalberty/unifi:stable

And tadaaa! Suddenly, I was able to access the Unifi Controller again. But when I stopped the command on the command line, the container would stop. So I needed a little trick.

  1. Start the docker container from the command line through an SSH session in the terminal.
  2. Verify that you can access the Unifi Controller
  3. Go to DSM and login, start the Docker app
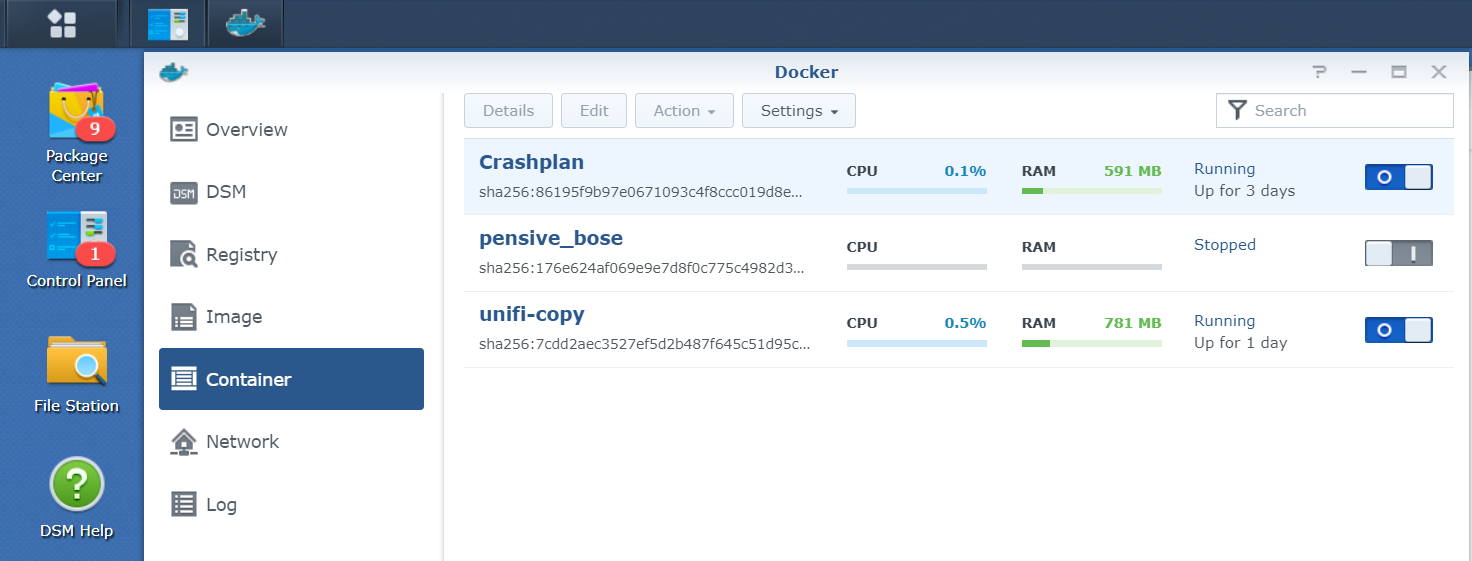
  4. Click on 'Container' and identify the unifi container. Right-click it, go to Settings and then Duplicate Settings. A copy container will be made, named unifi-copy.
  5. Kill the docker command from the terminal. But now you have a second copy.
  6. Tweak and configure the copy container as you like and start it from the DSM.

Alternatively, you could also use the -d option as per documentation.
--detach , -dRun container in background and print container ID

Tuesday, February 28, 2017

Installing Unifi Controller as a Docker container on Synology


Having Ubiquiti UniFi access points in your house is a great way to serve a meshed Wifi network. With a Synology NAS and DSM6, it's very easy now to run the UniFi Controller in a Docker container. Link to the docker image: https://hub.docker.com/r/jacobalberty/unifi/
These tutorials will greatly help you with that: miketabor.com and kapsi.fi. There's a few tweaks I had to make:
Change the container config and add UDP port 10001:10001
Make sure your firewall rules on your NAS are properly adapted (take the 10001/udp into account as well)

If you have deployed a UniFi Controller on a different system/instance before, make sure that you adopt the device on your new Controller by doing the following steps:
SSH login to your access point (access_point_ip:22) with credentials of the previous controller (e.g. administrator:yoursecretpass)
Now execute the following commands:
#mca-cli
#set-inform synology_nas_ip:8080/inform

Now you should see your device into your new Controller instance and you're good to go!

Sunday, February 26, 2017

Installing Entware onto Synology DSM6

You might run into the situation where you need to install an external package onto your DSM6. Entware is the way to go as a ton of packages are available. The steps to do are well listed here. Make sure you're root (sudo su -) before executing them.

Usage as per below:

# opkg update
Downloading http://pkg.entware.net/binaries/mipsel/Packages.gz.
Updated list of available packages in /opt/var/opkg-lists/entware-ng.

# opkg list transmission*
transmission-cli - 2.84-4 - CLI utilities for transmission.
transmission-daemon - 2.84-4 - Transmission is a simple BitTorrent client.
It features a very simple, intuitive interface
on top on an efficient, cross-platform back-end.
This package contains the daemon itself.
transmission-remote - 2.84-4 - CLI remote interface for transmission.
transmission-web - 2.84-4 - Webinterface resources for transmission.

# opkg install transmission-web
Installing transmission-web (2.84-4) to root...
Downloading http://pkg.entware.net/binaries/mipsel/transmission-web_2.84-4_mipselsf.ipk.
Installing transmission-daemon (2.84-4) to root...
Downloading http://pkg.entware.net/binaries/mipsel/transmission-daemon_2.84-4_mipselsf.ipk.
...

Saturday, February 18, 2017

Changing the Synology root password on DSM6

Since DSM, SSH login with root is disabled (good thing!), yet to change the root password, you need to follow these steps:

  1. SSH to machine as admin user
  2. Enter command "sudo -s" and provide your admin password
  3. Enter command "synouser --setpw root newpassword"
Becoming root can be done by:
sudo -i
or
sudo su -

Tuesday, February 14, 2017

Installing Crashplan docker image to Xpenology or Synology

Following the excellent tutorial by Mike Tabor, the only difference to my setup, was the need to change my local config for this location: C:\Users\username\AppData\Local\CrashPlan\.ui_info instead of the mentioned one.


Thursday, January 12, 2017

Alternative way to be testing command line if port is open or closed

Trying to find out on a Linux server or under Busybox (Synology) if a TCP port is open or closed? Use this handy command:

exec 6<>/dev/tcp/127.0.0.1/443 || echo "Port is not open"
exec 6>&- # close output connection
exec 6<&- # close input connection

6 is used as the file descriptor. 0,1,2 are stdin, stdout, and stderr. 5 is sometimes used by Bash for child processes, so 3,4,6,7,8, and 9 should be safe.

Alternatively, if the port you're probing is serving the HTTP(S) protocol:

exec 6<>/dev/tcp/127.0.0.1/443
echo -e "GET / HTTP/1.0\n" >&6
cat <&6

Alternative ways are listed here.

Tuesday, January 10, 2017

Installing SSLH onto Synology DSM6 or DSM7 for easy HTTPS, OpenVPN and SSH through corporate firewall

When you are in a corporate LAN, access to the outside is often restricted. HTTPS is allowed, yet other applications like SSH or OpenVPN might not be. As well, you want to run several of these services onto your Synology box. Choosing which one will use TCP port 443 could be a hard judgement to make. Luckily, there is SSLH to the rescue.

Note: with DSM7, it is no longer possible by default to open port 443 (which is below 1024) with the provided user (sh-sslh). You will get a "0.0.0.0:https:bind: Permission denied" error when changing port 30000 to 443. The fix is to change your portforwarding in your router to NAS_IP:30000 instead. The below tutorial was making the SSLH service listen to port 443 with the other services running on localhost:443.

 As a consequence, changing the sslh.cfg file and the NGINX files is no longer needed, so everything below can be ignorred.

Caution! Playing around with your SSL port could possibly break the access to your DSM if nginx fails to restart.
Therefore, I strongly recommend the following actions:

  • Never put your SSH server to listen ONLY onto 127.0.0.1. Never.
  • Never change all of your services (HTTPS, SSH, OpenVPN) at the same time, unless your 100% sure your config is correct.
  • Open up temporarily the Telnet service, just in case
  • Make sure you don't lock yourself out with your firewall rules onto your Synology
  • Backup the original config files before starting making changes. cp -p config.file config.file.ori will do.

0. Make sure you have the Synocommunity repository installed under your Package Center. Open up an SSH connection to your Synology and make yourself root.
1. Download and install the SSLH package. By default, the configuration file is at /usr/local/sslh/var/sslh.cfg and needs to be adapted. Make a backup copy of the file first.
2. Go to your terminal and edit the file with vi
vi /usr/local/sslh/var/sslh.cfg
3. Change the IP address (under host: "0.0.0.0") to your IPv4 address of the Synology. Do NOT yet change the port. Leave it onto 30000 as default.
4. Check if the services listed are using the correct port numbers and adapt if needed. Save the file.
5. Now go to the Package Center of DSM again and stop and start SSLH.
6. Go to your terminal and verify if SSLH is running properly by running the command:
netstat -an | grep 30000
Expected output:
root@server:/# netstat -an | grep 30000
tcp        0      0 192.168.0.5:30000       0.0.0.0:*               LISTEN
7. Check if HTTPS is currently running and listening to the IPv4 address:
netstat -an | grep 443
Expected output:
root@server:/# netstat -an | grep 443
tcp        0      0 0.0.0.0:443           0.0.0.0:*               LISTEN
tcp6       0      0 :::443                  :::*                    LISTEN
This now means that nginx is still listening onto the IPv4 address for HTTPS. Let's change that.
8. Open your web browser and browse to your Synology IP for both HTTP as for HTTPS: http://yourip and https://yourip
Confirm that this is working properly.
9. Go to the nginx config directory (/usr/syno/share/nginx) and backup the following files: DSM.mustache, WWWService.mustache and server.mustache
10. Use vi to change nginx from listening to 0.0.0.0:443 to 127.0.0.1:443 only, by making it look like this:
listen 127.0.0.1:443

DSM.mustache
WWWService.mustache
server.mustache
Repeat this for all 3 files and save your changes.
11. Restart nginx from the command line:
synoservicecfg --restart nginx
You can monitor into /var/log/synoservice.log if things restarted properly. Typical output should be:
2017-01-10T19:04:33+01:00 server synoservicecfg: service_restart.c:21 synoservice: restart [nginx] ...
2017-01-10T19:04:34+01:00 server synoservicecfg: service_restart.c:52 synoservice: finish restart [nginx].
12. Verify that HTTPS is only listening onto localhost (127.0.0.1)
root@server:/usr/syno/share/nginx# netstat -an | grep 443
tcp        0      0 127.0.0.1:443           0.0.0.0:*               LISTEN
tcp6       0      0 :::443                  :::*                    LISTEN
13. Refresh the browser screen for your HTTPS. It should not show any website anymore.
14. As a final step, change your SSLH config file and set the port to listen from 30000 to 443. Restart SSLH in the Package Center by doing a stop and start. Or do it command line:
synoservicecfg --restart pkgctl-sslh
15. Verify that SSLH is now listening onto your IPv4 address with port 443.
root@server:/usr/syno/share/nginx# netstat -an | grep 443
tcp        0      0 192.168.0.5:443         0.0.0.0:*               LISTEN
tcp        0      0 127.0.0.1:443           0.0.0.0:*               LISTEN
tcp6       0      0 :::443                  :::*                    LISTEN
16. You can test your HTTPS, OpenVPN and SSH. All should perfectly route through the SSLH multiplexer.


Monday, March 2, 2015

Synology default shell does not support regex

I was trying to write a script today that would parse a file and check if a line matches a regex. It would fail for unknown reasons, until I found out that the default shell within a Synology (ash), does not support this. Installing bash with ipkg solves this.

Script (not working in ash):
#!/bin/sh

FILENAME="status.txt"
LINENUM=0
REGEX="^(CLIENT_LIST)(.+)"

while read SINGLELINE
do
 LINENUM=$((LINENUM+1))

  if [[ $SINGLELINE =~ $REGEX ]]; then
  NUM_CLIENT=$((NUM_CLIENT+1))
  echo "Match CLIENT_LIST: $LINENUM"
 else
  echo "No match: $LINENUM"
 fi

done < "$FILENAME"

In my terminal:
$ ./status.sh
sh: 2.3.6: unknown operand

Script (working under bash):
#!/opt/bin/bash

FILENAME="status.txt"
LINENUM=0
REGEX="^(CLIENT_LIST)(.+)"

while read SINGLELINE
do
 LINENUM=$((LINENUM+1))

 if [[ $SINGLELINE =~ $REGEX ]]; then
  NUM_CLIENT=$((NUM_CLIENT+1))
  echo "Match CLIENT_LIST: $LINENUM"
 else
  echo "No match: $LINENUM"
 fi
done < "$FILENAME"

In my terminal:
$ ./status.sh
./status.sh
No match: 1
No match: 2
No match: 3
Match CLIENT_LIST: 4
No match: 5
No match: 6
No match: 7

Tip from: http://forum.synology.com/enu/viewtopic.php?f=27&t=77899